Audacity
Audacity Basics
Audacity is an open-source and free audio recording and editing software with an established community using and supporting it.
- Compatible with Windows, Mac, and Linux
- Supports third party plugins to extend its capabilities with additional effects and editing tools
Getting started
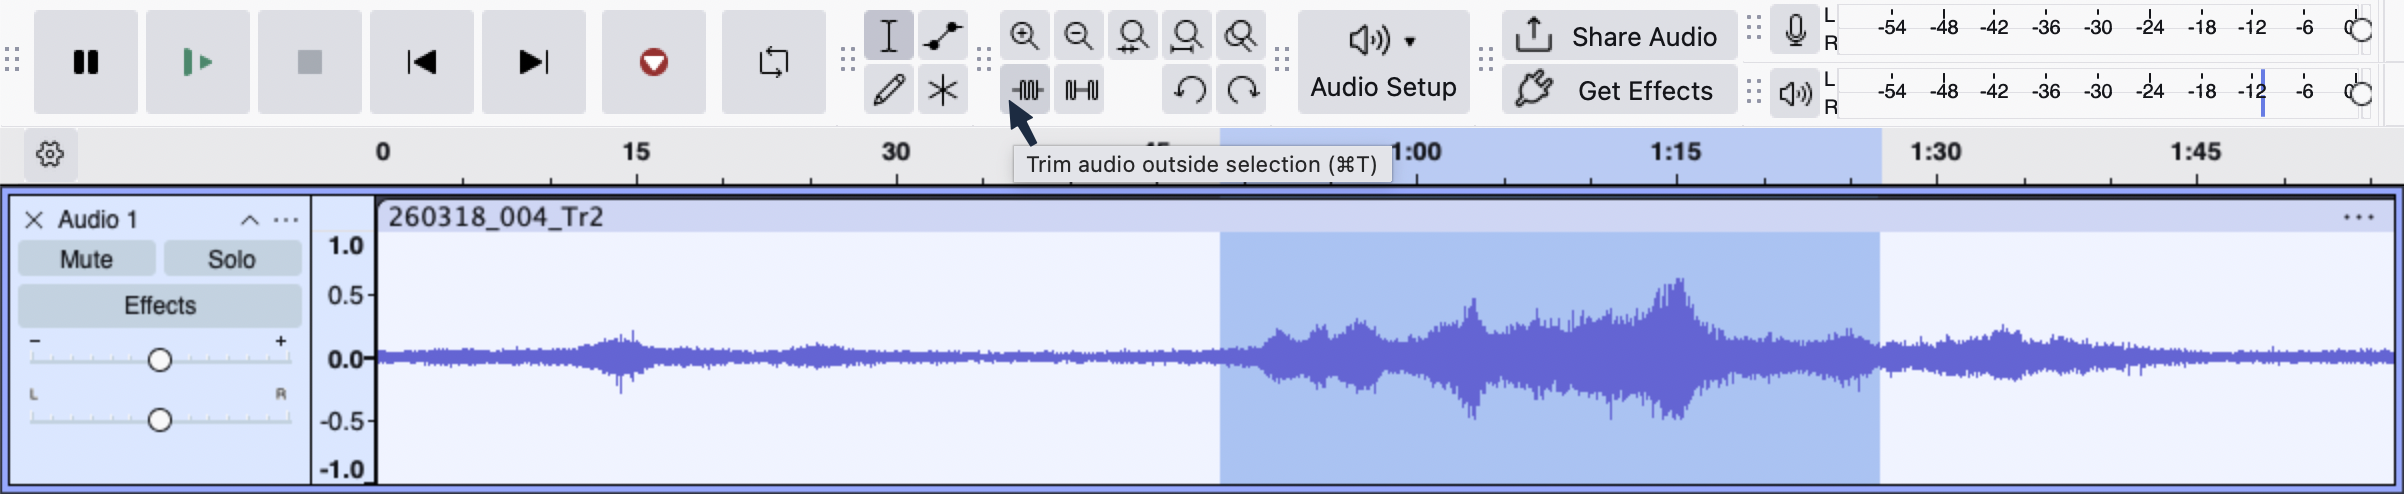
Main Toolbar
- Transport Controls: pause, play, stop, start, end, record, loop on/off
- Tools: selection, envelope, draw, multi-tool
- Editing Tools: (top row) zoom in, zoom out, zoom to selection, fit width, toggle zoom, (bottom row) trim, silence, undo, redo
- Audio Setup
- Share Audio and Get Effects
- Recording and Playback volume meters
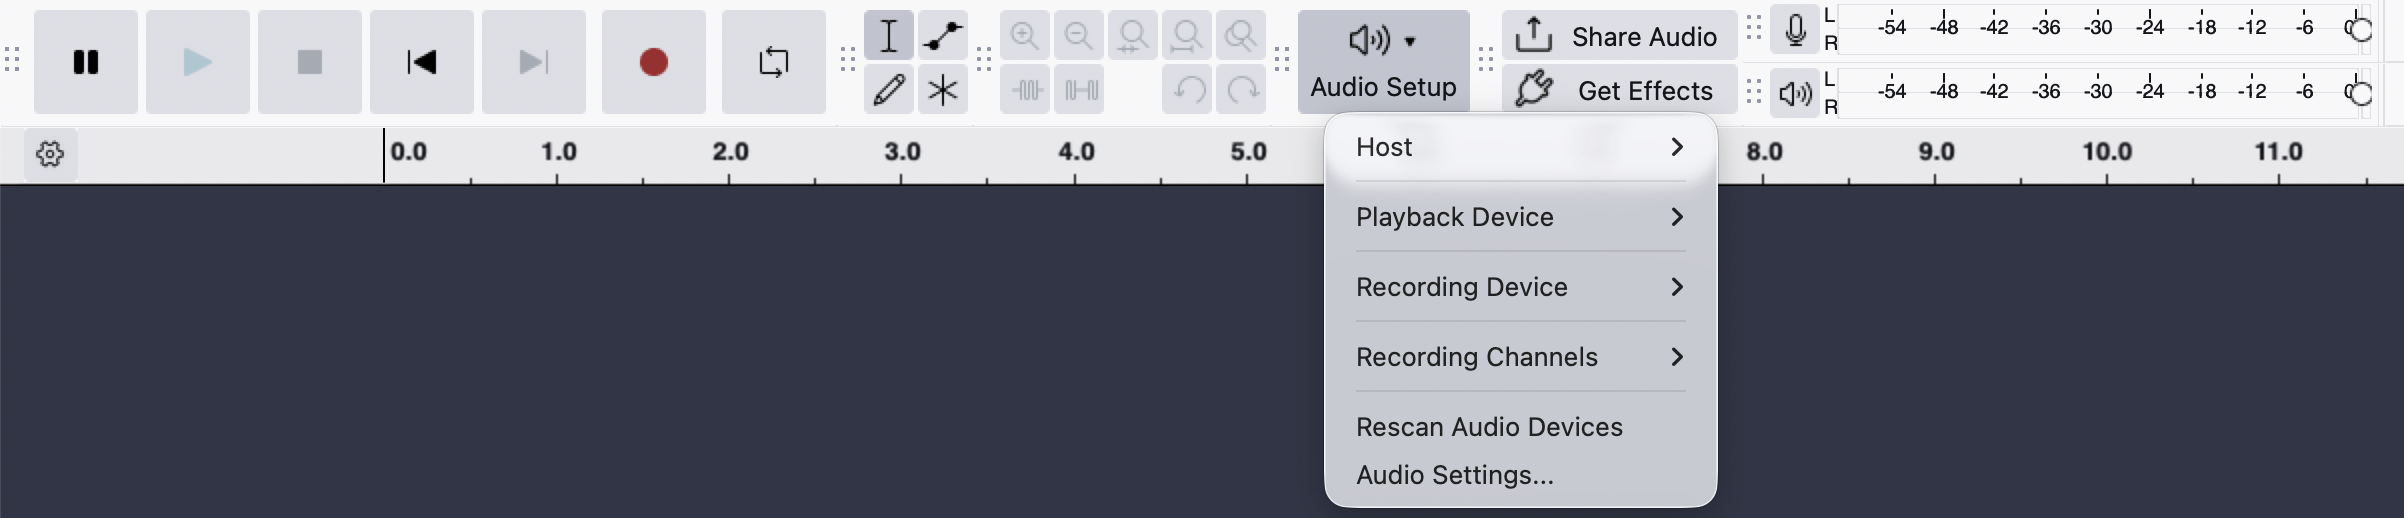
Audio Setup Options
- Click the Audio Setup button
- Mouse over the Playback Device then click on the appropriate option for your laptop (speakers, headphones, etc)
- Mouse over the Recording Device then click on the appropriate option for your laptop (built-in microphone, USB microphone, etc)
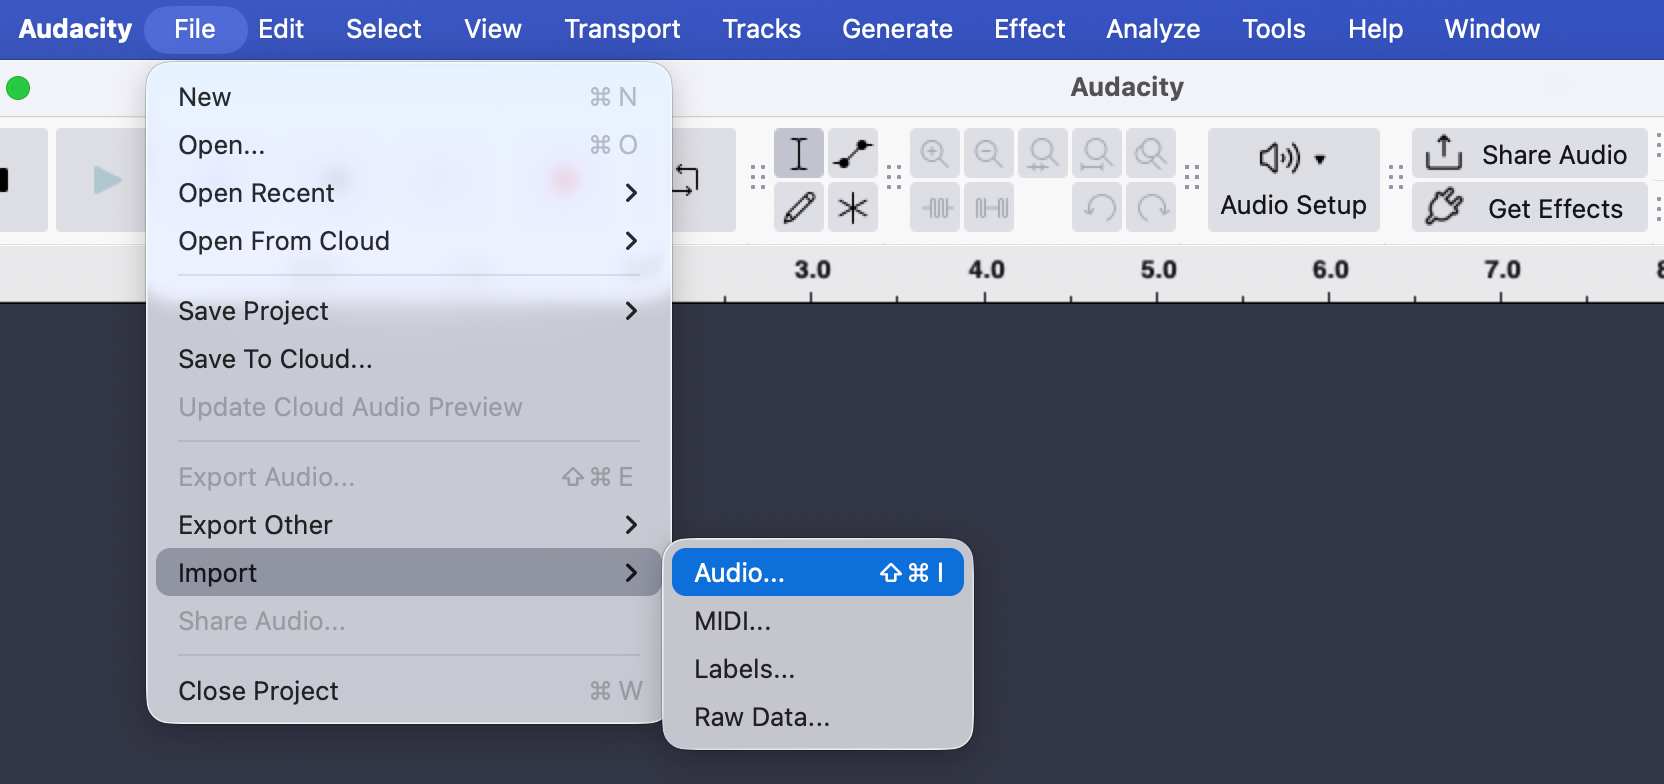
Importing audio
Import Audio
- Click File
- Mouse over Import then click on Audio…
- Select an audio file from the file browser and click Open
Track Control Panel
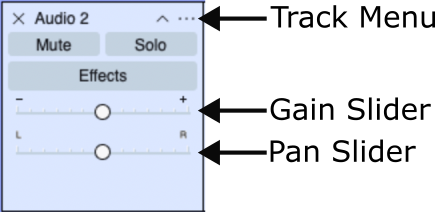
- Use the 3-dots menu (in the top right corner) to rename a track
- Use the gain slider (- / +) to adjust the playback volume of the track
- Use the pan slider (L / R) to adjust the left/right balance of the track
- Click in the empty space to highlight the entire track
- Use the collapse button (chevron, top-right) to collapse or restore track height
- Audio Clip (waveform)
Deleting and trimming audio
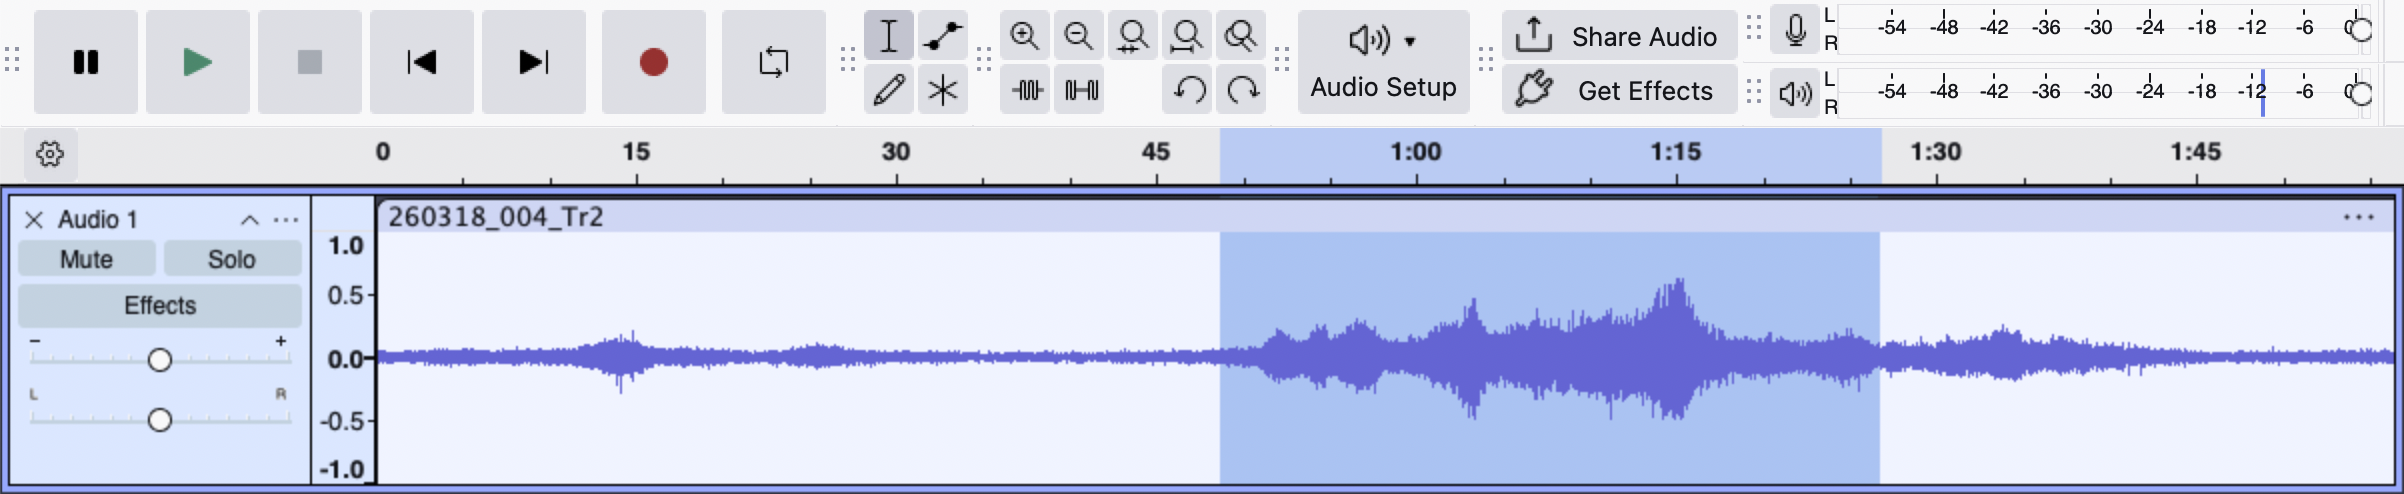
Delete a selection of audio
- Click and drag to highlight the selection of audio to be deleted
- Press the Delete or Backspace key on the keyboard
 ↓ ↓ ↓
↓ ↓ ↓

Trim audio around a selection
- Click and drag to highlight the section of audio to keep
- Click the Trim tool to delete audio outside of your selction
 ↓ ↓ ↓
↓ ↓ ↓

Recording audio
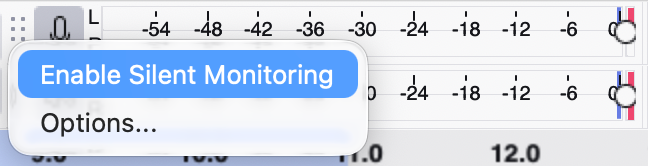
Check your recording level
- Click on the microphone button next to the volume meter then click Enable Silent Monitoring
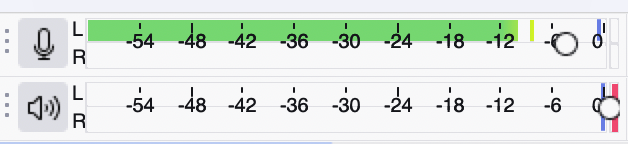
- Speak into your microphone to ensure the recording device is properly configured
- The ideal volume level should peak between -12dB and -6dB
- Adjust the slider located on the right side of the volume meter if your levels are too high (if your mic has an input level control you can make adjustments there)
Start recording
- Click the record button (red circle) to begin recording
- Click the stop button (black square) or press the space bar on the keyboard to end the recording
- You can record additional audio onto an existing track by clicking the record button again
- the audio will automatically start after any existing clips on the track
- or place the playhead anywhere in the track to start recording the new audio from that point
Recording Best Practices
- Warm up! Do vocal exercises. Read over your script out loud
- Avoid dairy, coffee, or soda before recording
- Keep the microphone 4-6 inches away from your mouth
- Use a windscreen to limit plosives and noise from wind, etc.
- Test your recording and audio levels before recording your material
- Average level: -16 dB to –10dB (with a peak of –6dB max) for your narrative audio
- Keep notes while you record
- Record timestamps for areas of interest (or in need of editing)
- Always keep a version of your original audio files saved and unedited
- keep them in a separate folder from the files for editing
- maintain naming conventions
- Record 4-5 seconds of silence at the beginning and end of a track
- this is called “room noise”
- Listen while you record
- wear headphones to monitor while you record to avoid losing audio to distortion or other recording issues
Applying Effects
normalize audio
Normalize volume
- Highlight the clip(s) you’d like to adjust by clicking the top of a track (clip- handle drag-bar) or click Select (bottom of the track control panel) to highlight the entire track
- Click Effect > Volume and Compression > Normalize…
- Check the top two boxes and enter a value of -1.0dB then click Apply
removing background noise
step 1 of 2
Noise reduction
- Highlight a section of the audio clip the where the background noise is isolated
- Click Effect > Noise Removal and Repair > Noise Reduction
- Click on Get Noise Profile
step 2 of 2
Noise reduction
- Highlight a new section of the audio clip that includes some of the isolated noise followed by the remainder of the track
- Click Effect > Noise Removal and Repair > Noise Reduction
- Click the Preview button to audition the processed result
- Adjust the first two sliders and Preview again until you are satisfied with the result (the preview only runs for 3 seconds, which is why you should highlight the audio close where the desired recording starts)
- Click the OK button to complete the noise reduction process
Editing and Arranging
trimming audio clips
Trimming a clip
- Mouse over the left or right edge of an audio clip and the pointer will turn into a square bracket with arrows = Click and hold the left mouse button then drag the bracket left or right to start or end of a clip
- This is a non-destructive process so it does not delete the audio; you may drag the edge back to reveal the audio you trimmed earlier
splitting audio clips
Splitting a clip
- Left click on the track where you would like to split the audio clip
- Right click anywhere on the same track then click Split Clip or use the keyboard shortcut (Ctrl+I on Windows, Command+I on Mac)
- You may use the non-destructive trimming feature on clips that have been split or select and delete one of the new split clips
arranging tracks
Arranging Audio Clips
- Mouse over the top of a track (clip-handle drag-bar) and the pointer will turn into a hand
- Click and hold the left mouse button then drag the audio clip left or right; release the mouse button to drop the audio clip in place
- You can also drag a clip up or down to another existing track as long as there is an empty space to drop it
Editing Best Practices
- Keep a backup of your original audio and use copies for editing
- Find and use music with a Creative Commons license to avoid violating copyright
- Establish a descriptive naming convention and be consistent
- Keep original and edited files in organized well-labeled folders
- Plan and apply a style guide for your podcast to ensure a consistent sound and feel
- Elements of your style guide can include opening and closing music, sound effects, transition cues, regular segments, etc
- Judge the level of your volume by listening and using the Playback meter
- The meter is useful but you can hear issues in your audio better than you can see them!
- Always listen to your final mix before and after exporting to ensure that you haven't missed any issues, such as shifted tracks, missing music, or cut off audio
potential editing workflow
- Listen to what you have recorded and collected
- Decide what to keep, what to delete, what to add, and what order to put them in
- Roughly arrange your clips, music and sound effects in your DAW
- Use Noise Reduction to reduce background sound, and Normalize the volume between tracks
- Listen again to take out the unwanted sounds and make further cuts and edits
- Listen again and export your audio
Using Other Audio Sources
Copyright
About copyright
Creative Commons
Creative Commons licensed media is ideal for use in audio and video projects because the CC license clearly indicates how material can be legally used or adapted in your own work.
Creative Commons Choose your licence tool
Royalty Free
Royalty free image, sound, or video assets are typically available for an upfront cost but can be used for multiple projects without having to pay additional or ongoing fees.
Fair Dealing
Fair Dealing is a user right in Canadian copyright law that lets you use limited amounts of someone else’s copyrighted work without asking permission for the purpose of research, private study, criticism, review or news reporting, education, and satire or parody.
Recommended sources to find open licenced music, and sound effects
Music
- Internet Archive Netlabels (All genres)
- Free Music Archive (All genres)
- IMSLP Recordings (Classical)
- YouTube Audio Library (All genres)
- YouTube RFM - NCM (All genres)
Sound Effects
Volume
track volume
sick fades
Fade in / Fade Out / Studio Fade Out
- Highlight the section of a clip you’d like to fade in or out
- Click Effect > Fading > Fade In/Out/Studio Fade Out
- The Studio Fade Out uses a curved taper and sounds smoother compared to a regular Fade Out, which is a linear taper from full volume to silence
fine-tuning volume levels
Volume Envelope Tool
- Click the Envelope Tool and notice the blue lines that appear at the top and bottom of each track
- Hover your mouse over the line and it will turn into to inward facing arrows
- Click once to place an edit point; you can place as many as you wish
- Click and drag an edit point to adjust how the volume of the track will be affected
- To remove an unwanted edit point, click-and-drag the point up, off the track
Saving and Exporting
saving
Lorem ipsum
export as mp3
Exporting a project as an mp3
- Click File > Export Audio…
- Enter a name for the file and choose a location to save it
- Format: MP3 Files
- Channels: Mono or Stereo
- Sample Rate: 44100 Hz or 48000 Hz
- Bit Rate Mode: Preset
- Quality: Standard, 170-210 kbps
- Export Range: Entire Project
metadata
Adding Metadata to your exported file
- Click the Edit Metadata… button
- Type your name in the Artist Name field
- Type your podcast episode title in the Track Title field
- Complete the remainder of the fields as you wish
- You may add custom fields by typing in the Tag column; click the Add button to create additional rows
- Click OK to save and close the Metadata Editor then click Export
Mono vs Stero
About mono and stereo audio.
fixing a stereo imbalance
Mix a stereo track down to mono
Unless you change the settings on the Zoom H4N Pro before you begin, the default recording will be a stereo file
- In the example above, the right microphone picked up the audio more than the left, creating an unbalanced sound (note the right channel has a largerwaveform)
- For a single voice, spoken word recording this will be distracting to your listener
- A recommended solution is to mix down the stereo track to a mono track
- This does not apply if you are recording a soundscape or ambient noise where a volume imbalance between the left and right channels may be desired to create a sense of space and movement
transforming stereo to mono
Mix Stereo Down to Mono
- Select the stereo track byclicking the track header or theSelect button
- Click Tracks > Mix > Mix StereoDown to Mono